Table of Contents
- 16.1. RAIDframe Introduction
- 16.2. Setup RAIDframe Support
- 16.3. Example: RAID-1 Root Disk
- 16.3.1. Pseudo-Process Outline
- 16.3.2. Hardware Review
- 16.3.3. Initial Install on Disk0/wd0
- 16.3.4. Preparing Disk1/wd1
- 16.3.5. Initializing the RAID Device
- 16.3.6. Setting up Filesystems
- 16.3.7. Migrating System to RAID
- 16.3.8. The first boot with RAID
- 16.3.9. Adding Disk0/wd0 to RAID
- 16.3.10. Testing Boot Blocks
NetBSD uses the CMU RAIDframe software for its RAID subsystem. NetBSD is the primary platform for RAIDframe development. NetBSD also has another in-kernel RAID level 0 system in its ccd(4) subsystem (see Chapter 15, Concatenated Disk Device (CCD) configuration). You should possess some basic knowledge about RAID concepts and terminology before continuing. You should also be at least familiar with the different levels of RAID - Adaptec provides an excellent reference, and the raid(4) manpage contains a short overview too.
RAIDframe is a Software RAID implementation, as opposed to Hardware RAID. As such, it does not need special disk controllers supported by NetBSD. System administrators should give a great deal of consideration to whether software RAID or hardware RAID is more appropriate for their “Mission Critical” applications. For some projects you might consider the use of many of the hardware RAID devices supported by NetBSD. It is truly at your discretion what type of RAID you use, but it is recommend that you consider factors such as: manageability, commercial vendor support, load-balancing and failover, etc.
Depending on the RAID level used, RAIDframe does provide redundancy in the event of a hardware failure. However, it is not a replacement for reliable backups! Software and user-error can still cause data loss. RAIDframe may be used as a mechanism for facilitating backups in systems without backup hardware, but this is not an ideal configuration. Finally, with regard to "high availability", RAID is only a very small component to ensuring data availability.
Once more for good measure: Back up your data!
If you encounter problems using RAIDframe, you have several options for obtaining help.
Read the RAIDframe man pages: raid(4) and raidctl(8) thoroughly.
Search the mailing list archives. Unfortunately, there is no NetBSD list dedicated to RAIDframe support. Depending on the nature of the problem, posts tend to end up in a variety of lists. At a very minimum, search netbsd-users@NetBSD.org, current-users@NetBSD.org. Also search the list for the NetBSD platform on which you are using RAIDframe: port-
${ARCH}@NetBSD.org.Search the Problem Report database.
If your problem persists: Post to the mailing list most appropriate (judgment call). Collect as much verbosely detailed information as possible before posting: Include your dmesg(8) output from
/var/run/dmesg.boot, your kernel config(5) , your/etc/raid[0-9].conf, any relevant errors on/dev/console,/var/log/messages, or tostdout/stderrof raidctl(8). The output of raidctl -s (if available) will be useful as well. Also include details on the troubleshooting steps you've taken thus far, exactly when the problem started, and any notes on recent changes that may have prompted the problem to develop. Remember to be patient when waiting for a response.
The use of RAID will require software and hardware configuration changes.
The GENERIC kernel already has support for RAIDframe. If you have built a custom kernel for your environment the kernel configuration must have the following options:
pseudo-device   raid            8       # RAIDframe disk driver
options         RAID_AUTOCONFIG         # auto-configuration of RAID components
The RAID support must be detected by the NetBSD kernel, which can be checked by looking at the output of the dmesg(8) command.
# dmesg|grep -i raid
Kernelized RAIDframe activated
Historically, the kernel must also contain static mappings between bus
addresses and device nodes in /dev. This
used to
ensure consistency of devices within RAID sets in the event of a
device failure after reboot. Since NetBSD 1.6, however, using
the auto-configuration features of RAIDframe has been
recommended over statically mapping devices. The
auto-configuration features allow drives to move around on the
system, and RAIDframe will automatically determine which
components belong to which RAID sets.
If your system has an Uninterruptible Power Supply (UPS), and/or if your system has redundant power supplies, you should consider enabling the read and write caches on your drives. On systems with redundant power, this will improve drive performance. On systems without redundant power, the write cache could endanger the integrity of RAID data in the event of a power loss.
The dkctl(8) utility can be used for this on all kinds of disks that support the operation (SCSI, EIDE, SATA, ...):
#dkctlwd0getcache /dev/rwd0d: read cache enabled /dev/rwd0d: read cache enable is not changeable /dev/rwd0d: write cache enable is changeable /dev/rwd0d: cache parameters are not savable#dkctlwd0setcache rw#dkctlwd0getcache /dev/rwd0d: read cache enabled /dev/rwd0d: write-back cache enabled /dev/rwd0d: read cache enable is not changeable /dev/rwd0d: write cache enable is changeable /dev/rwd0d: cache parameters are not savable
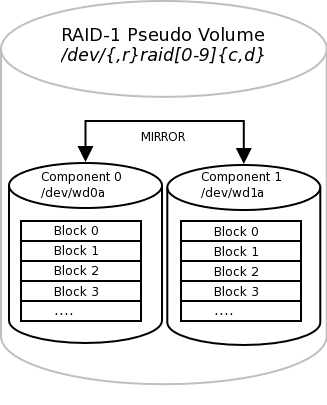
This example explains how to setup RAID-1 root disk. With RAID-1 components are mirrored and therefore the server can be fully functional in the event of a single component failure. The goal is to provide a level of redundancy that will allow the system to encounter a component failure on either component disk in the RAID and:
Continue normal operations until a maintenance window can be scheduled.
Or, in the unlikely event that the component failure causes a system reboot, be able to quickly reconfigure the system to boot from the remaining component (platform dependent).
Because RAID-1 provides both redundancy and performance
improvements, its most practical application is on critical
"system" partitions such as /,
/usr, /var,
swap, etc., where read operations are more
frequent than write operations. For other file systems, such as
/home or
/var/,
other RAID levels might be considered (see the references above).
If one were simply creating a generic RAID-1 volume for a non-root
file system, the cookie-cutter examples from the man page could be
followed, but because the root volume must be bootable, certain
special steps must be taken during initial setup. {application}
Note
This example will outline a process that differs only slightly between the x86 and sparc64 platforms. In an attempt to reduce excessive duplication of content, where differences do exist and are cosmetic in nature, they will be pointed out using a section such as this. If the process is drastically different, the process will branch into separate, platform dependent steps.
Although a much more refined process could be developed using a custom copy of NetBSD installed on custom-developed removable media, presently the NetBSD install media lacks RAIDframe tools and support, so the following pseudo process has become the de facto standard for setting up RAID-1 Root.
-
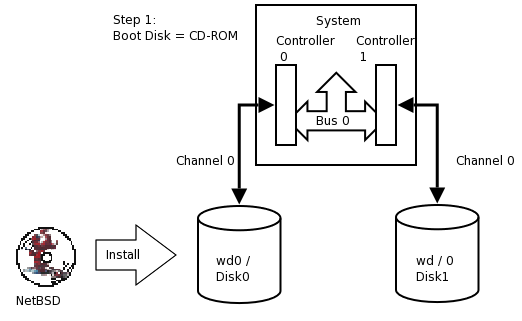
Install a stock NetBSD onto Disk0 of your system.
-
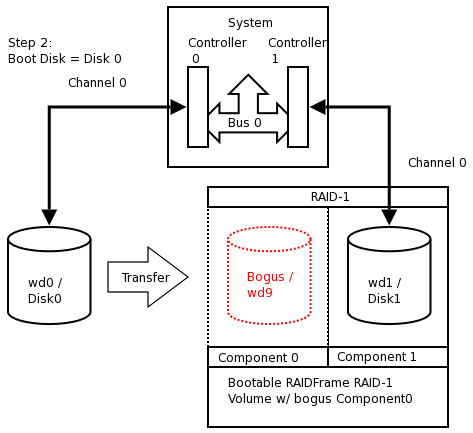
Use the installed system on Disk0/wd0 to setup a RAID Set composed of Disk1/wd1 only.
-
Reboot the system off the Disk1/wd1 with the newly created RAID volume.
-
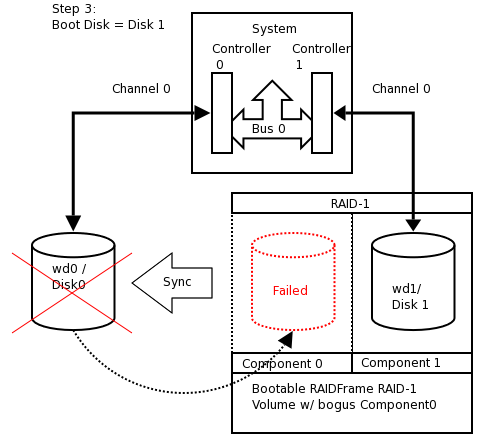
Add / re-sync Disk0/wd0 back into the RAID set.
At present, the alpha, amd64, i386, pmax, sparc, sparc64, and vax NetBSD platforms support booting from RAID-1. Booting is not supported from any other RAID level. Booting from a RAID set is accomplished by teaching the 1st stage boot loader to understand both 4.2BSD/FFS and RAID partitions. The 1st boot block code only needs to know enough about the disk partitions and file systems to be able to read the 2nd stage boot blocks. Therefore, at any time, the system's BIOS / firmware must be able to read a drive with 1st stage boot blocks installed. On the x86 platform, configuring this is entirely dependent on the vendor of the controller card / host bus adapter to which your disks are connected. On sparc64 this is controlled by the IEEE 1275 Sun OpenBoot Firmware.
This article assumes two identical
IDE disks (/dev/wd)
which we are going to mirror (RAID-1). These disks are identified
as:{0,1}
# grep ^wd /var/run/dmesg.boot
wd0 at atabus0 drive 0: <WDC WD100BB-75CLB0>
wd0: drive supports 16-sector PIO transfers, LBA addressing
wd0: 9541 MB, 19386 cyl, 16 head, 63 sec, 512 bytes/sect x 19541088 sectors
wd0: drive supports PIO mode 4, DMA mode 2, Ultra-DMA mode 5 (Ultra/100)
wd0(piixide0:0:0): using PIO mode 4, Ultra-DMA mode 2 (Ultra/33) (using DMA data transfers)

wd1 at atabus1 drive 0: <WDC WD100BB-75CLB0>
wd1: drive supports 16-sector PIO transfers, LBA addressing
wd1: 9541 MB, 19386 cyl, 16 head, 63 sec, 512 bytes/sect x 19541088 sectors
wd1: drive supports PIO mode 4, DMA mode 2, Ultra-DMA mode 5 (Ultra/100)
wd1(piixide0:1:0): using PIO mode 4, Ultra-DMA mode 2 (Ultra/33) (using DMA data transfers)
Note
If you are using SCSI, replace
/dev/{,r}wd{0,1} with
/dev/{,r}sd{0,1}
In this example, both disks are jumpered as Master on separate channels on the same controller. You would never want to have both disks on the same bus on the same controller; this creates a single point of failure. Ideally you would have the disks on separate channels on separate controllers. Some SCSI controllers have multiple channels on the same controller, however, a SCSI bus reset on one channel could adversely affect the other channel if the ASIC/IC becomes overloaded. The trade-off with two controllers is that twice the bandwidth is used on the system bus. For purposes of simplification, this example shows two disks on different channels on the same controller.
Note
RAIDframe requires that all components be of the same size. Actually, it will use the lowest common denominator among components of dissimilar sizes. For purposes of illustration, the example uses two disks of identical geometries. Also, consider the availability of replacement disks if a component suffers a critical hardware failure.
Tip
Two disks of identical vendor model numbers could have different geometries if the drive possesses "grown defects". Use a low-level program to examine the grown defects table of the disk. These disks are obviously suboptimal candidates for use in RAID and should be avoided.
Perform a very generic installation onto your Disk0/wd0. Follow the INSTALL instructions for your platform. Install all the sets but do not bother customizing anything other than the kernel as it will be overwritten. See also Chapter 2, Installing NetBSD: Preliminary considerations and preparations.
Tip
On x86, during the sysinst install, when prompted if you want to "use the entire disk for NetBSD", answer "yes".
Once the installation is complete, you should examine the disklabel(8) and fdisk(8) / sunlabel(8) outputs on the system:
# df
Filesystem   1K-blocks        Used       Avail %Cap Mounted on
/dev/wd0a       9487886      502132     8511360   5% /
On x86:
#disklabel -r wd0 type: unknown disk: Disk00 label: flags: bytes/sector: 512 sectors/track: 63 tracks/cylinder: 16 sectors/cylinder: 1008 cylinders: 19386 total sectors: 19541088 rpm: 3600 interleave: 1 trackskew: 0 cylinderskew: 0 headswitch: 0 # microseconds track-to-track seek: 0 # microseconds drivedata: 0 16 partitions: # size offset fstype [fsize bsize cpg/sgs] a: 19276992 63 4.2BSD 1024 8192 46568 # (Cyl. 0* - 19124*) b: 264033 19277055 swap # (Cyl. 19124* - 19385) c: 19541025 63 unused 0 0 # (Cyl. 0* - 19385) d: 19541088 0 unused 0 0 # (Cyl. 0 - 19385)#fdisk /dev/rwd0d Disk: /dev/rwd0d NetBSD disklabel disk geometry: cylinders: 19386, heads: 16, sectors/track: 63 (1008 sectors/cylinder) total sectors: 19541088 BIOS disk geometry: cylinders: 1023, heads: 255, sectors/track: 63 (16065 sectors/cylinder) total sectors: 19541088 Partition table: 0: NetBSD (sysid 169) start 63, size 19541025 (9542 MB, Cyls 0-1216/96/1), Active 1: <UNUSED> 2: <UNUSED> 3: <UNUSED> Bootselector disabled. First active partition: 0
On Sparc64 the command / output differs slightly:
#disklabel -r wd0 type: unknown disk: Disk0 [...snip...] 8 partitions: # size offset fstype [fsize bsize cpg/sgs] a: 19278000 0 4.2BSD 1024 8192 46568 # (Cyl. 0 - 19124) b: 263088 19278000 swap # (Cyl. 19125 - 19385) c: 19541088 0 unused 0 0 # (Cyl. 0 - 19385)#sunlabel /dev/rwd0c sunlabel> P a: start cyl = 0, size = 19278000 (19125/0/0 - 9413.09Mb) b: start cyl = 19125, size = 263088 (261/0/0 - 128.461Mb) c: start cyl = 0, size = 19541088 (19386/0/0 - 9541.55Mb)
Once you have a stock install of NetBSD on Disk0/wd0, you are ready to begin. Disk1/wd1 will be visible and unused by the system. To setup Disk1/wd1, you will use disklabel(8) to allocate the entire second disk to the RAID-1 set.
Tip
The best way to ensure that Disk1/wd1 is completely empty is to 'zero' out the first few sectors of the disk with dd(1) . This will erase the MBR (x86) or Sun disk label (sparc64), as well as the NetBSD disk label. If you make a mistake at any point during the RAID setup process, you can always refer to this process to restore the disk to an empty state.
Note
On sparc64, use /dev/rwd1c instead of
/dev/rwd1d!
# dd if=/dev/zero of=/dev/rwd1d bs=8k count=1
1+0 records in
1+0 records out
8192 bytes transferred in 0.003 secs (2730666 bytes/sec)
Once this is complete, on x86, verify that both the MBR and NetBSD disk labels are gone. On sparc64, verify that the Sun Disk label is gone as well.
On x86:
#fdisk /dev/rwd1d fdisk: primary partition table invalid, no magic in sector 0 Disk: /dev/rwd1d NetBSD disklabel disk geometry: cylinders: 19386, heads: 16, sectors/track: 63 (1008 sectors/cylinder) total sectors: 19541088 BIOS disk geometry: cylinders: 1023, heads: 255, sectors/track: 63 (16065 sectors/cylinder) total sectors: 19541088 Partition table: 0: <UNUSED> 1: <UNUSED> 2: <UNUSED> 3: <UNUSED> Bootselector disabled.#disklabel -r wd1 [...snip...] 16 partitions: # size offset fstype [fsize bsize cpg/sgs] c: 19541025 63 unused 0 0 # (Cyl. 0* - 19385) d: 19541088 0 unused 0 0 # (Cyl. 0 - 19385)
On sparc64:
#sunlabel /dev/rwd1c sunlabel: bogus label on `/dev/wd1c' (bad magic number)#disklabel -r wd1 [...snip...] 3 partitions: # size offset fstype [fsize bsize cpg/sgs] c: 19541088 0 unused 0 0 # (Cyl. 0 - 19385) disklabel: boot block size 0 disklabel: super block size 0
Now that you are certain the second disk is empty, on x86 you must establish the MBR on the second disk using the values obtained from Disk0/wd0 above. We must remember to mark the NetBSD partition active or the system will not boot. You must also create a NetBSD disklabel on Disk1/wd1 that will enable a RAID volume to exist upon it. On sparc64, you will need to simply disklabel(8) the second disk which will write the proper Sun Disk Label.
Tip
disklabel(8) will use your shell' s environment
variable $EDITOR variable to edit the
disklabel. The default is vi(1)
On x86:
#fdisk -0ua /dev/rwd1d fdisk: primary partition table invalid, no magic in sector 0 Disk: /dev/rwd1d NetBSD disklabel disk geometry: cylinders: 19386, heads: 16, sectors/track: 63 (1008 sectors/cylinder) total sectors: 19541088 BIOS disk geometry: cylinders: 1023, heads: 255, sectors/track: 63 (16065 sectors/cylinder) total sectors: 19541088 Do you want to change our idea of what BIOS thinks? [n] Partition 0: <UNUSED> The data for partition 0 is: <UNUSED> sysid: [0..255 default: 169] start: [0..1216cyl default: 63, 0cyl, 0MB] size: [0..1216cyl default: 19541025, 1216cyl, 9542MB] bootmenu: [] Do you want to change the active partition? [n] y Choosing 4 will make no partition active. active partition: [0..4 default: 0] 0 Are you happy with this choice? [n] y We haven't written the MBR back to disk yet. This is your last chance. Partition table: 0: NetBSD (sysid 169) start 63, size 19541025 (9542 MB, Cyls 0-1216/96/1), Active 1: <UNUSED> 2: <UNUSED> 3: <UNUSED> Bootselector disabled. Should we write new partition table? [n] y#disklabel -r -e -I wd1 type: unknown disk: Disk1 label: flags: bytes/sector: 512 sectors/track: 63 tracks/cylinder: 16 sectors/cylinder: 1008 cylinders: 19386 total sectors: 19541088 [...snip...] 16 partitions: # size offset fstype [fsize bsize cpg/sgs] a: 19541025 63 RAID # (Cyl. 0*-19385) c: 19541025 63 unused 0 0 # (Cyl. 0*-19385) d: 19541088 0 unused 0 0 # (Cyl. 0 -19385)
On sparc64:
#disklabel -r -e -I wd1 type: unknown disk: Disk1 label: flags: bytes/sector: 512 sectors/track: 63 tracks/cylinder: 16 sectors/cylinder: 1008 cylinders: 19386 total sectors: 19541088 [...snip...] 3 partitions: # size offset fstype [fsize bsize cpg/sgs] a: 19541088 0 RAID # (Cyl. 0 - 19385) c: 19541088 0 unused 0 0 # (Cyl. 0 - 19385)#sunlabel /dev/rwd1c sunlabel> P a: start cyl = 0, size = 19541088 (19386/0/0 - 9541.55Mb) c: start cyl = 0, size = 19541088 (19386/0/0 - 9541.55Mb)
Note
On x86, the c: and d: slices are reserved. c: represents the NetBSD portion of the disk. d: represents the entire disk. Because we want to allocate the entire NetBSD MBR partition to RAID, and because a: resides within the bounds of c:, the a: and c: slices have same size and offset values. The offset must start at a track boundary (an increment of sectors matching the sectors/track value in the disk label). On sparc64 however, c: represents the entire NetBSD partition in the Sun disk label and d: is not reserved. Also note that sparc64's c: and a: require no offset from the beginning of the disk, however if they should need to be, the offset must start at a cylinder boundary (an increment of sectors matching the sectors/cylinder value).
Next we create the configuration file for the RAID set /
volume. Traditionally, RAIDframe configuration files belong in
/etc and would be read and initialized at
boot time, however, because we are creating a bootable RAID
volume, the configuration data will actually be written into the
RAID volume using the "auto-configure" feature. Therefore, files
are needed only during the initial setup and should not reside in
/etc.
# vi /var/tmp/raid0.conf
START array
1 2 0

START disks
absent
/dev/wd1a

START layout
128 1 1 1

START queue
fifo 100
Note that absent means a non-existing disk.
This will allow us to establish the RAID volume with a bogus
component that we will substitute for Disk0/wd0 at a later
time.
Next we configure the RAID device and initialize the serial
number to something unique. In this example we use a
"YYYYMMDDRevision" scheme. The format
you choose is entirely at your discretion, however the scheme you
choose should ensure that no two RAID sets use the same serial
number at the same time.
After that we initialize the RAID set for the first time, safely ignoring the errors regarding the bogus component.
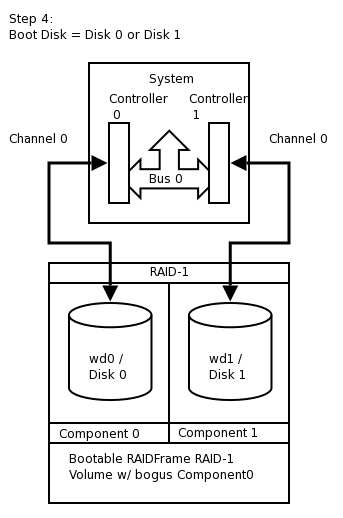
#raidctl -v -C /var/tmp/raid0.conf raid0 Ignoring missing component at column 0 raid0: Component absent being configured at col: 0 Column: 0 Num Columns: 0 Version: 0 Serial Number: 0 Mod Counter: 0 Clean: No Status: 0 Number of columns do not match for: absent absent is not clean! raid0: Component /dev/wd1a being configured at col: 1 Column: 0 Num Columns: 0 Version: 0 Serial Number: 0 Mod Counter: 0 Clean: No Status: 0 Column out of alignment for: /dev/wd1a Number of columns do not match for: /dev/wd1a /dev/wd1a is not clean! raid0: There were fatal errors raid0: Fatal errors being ignored. raid0: RAID Level 1 raid0: Components: component0[**FAILED**] /dev/wd1a raid0: Total Sectors: 19540864 (9541 MB)#raidctl -v -I 2009122601 raid0#raidctl -v -i raid0 Initiating re-write of parity raid0: Error re-writing parity! Parity Re-write status:#tail -1 /var/log/messages Dec 26 00:00:30 /netbsd: raid0: Error re-writing parity!#raidctl -v -s raid0 Components: component0: failed /dev/wd1a: optimal No spares. component0 status is: failed. Skipping label. Component label for /dev/wd1a: Row: 0, Column: 1, Num Rows: 1, Num Columns: 2 Version: 2, Serial Number: 2009122601, Mod Counter: 7 Clean: No, Status: 0 sectPerSU: 128, SUsPerPU: 1, SUsPerRU: 1 Queue size: 100, blocksize: 512, numBlocks: 19540864 RAID Level: 1 Autoconfig: No Root partition: No Last configured as: raid0 Parity status: DIRTY Reconstruction is 100% complete. Parity Re-write is 100% complete. Copyback is 100% complete.
Caution
The root filesystem must begin at sector 0 of the RAID device. Else, the primary boot loader will be unable to find the secondary boot loader.
The RAID device is now configured and available. The RAID
device is a pseudo disk-device. It will be created with a default
disk label. You must now determine the proper sizes for disklabel
slices for your production environment. For purposes of
simplification in this example, our system will have 8.5 gigabytes
dedicated to / as
/dev/raid0a and the rest allocated to
swap as
/dev/raid0b.
Caution
This is an unrealistic disk layout for a production server; the NetBSD Guide can expand on proper partitioning technique. See Chapter 2, Installing NetBSD: Preliminary considerations and preparations
Note
Note that 1 GB is 2*1024*1024=2097152 blocks (1 block is 512 bytes, or 0.5 kilobytes). Despite what the underlying hardware composing a RAID set is, the RAID pseudo disk will always have 512 bytes/sector.
Note
In our example, the space allocated to the underlying
a: slice composing the RAID set differed
between x86 and sparc64, therefore the total sectors of the RAID
volumes differs:
On x86:
 # disklabel -r -e -I raid0
type: RAID
disk: raid
label: fictitious
flags:
bytes/sector: 512
sectors/track: 128
tracks/cylinder: 8
sectors/cylinder: 1024
cylinders: 19082
total sectors: 19540864
rpm: 3600
interleave: 1
trackskew: 0
cylinderskew: 0
headswitch: 0 # microseconds
track-to-track seek: 0 # microseconds
drivedata: 0

#        size    offset     fstype [fsize bsize cpg/sgs]
 a:  19015680         0     4.2BSD      0     0     0  # (Cyl.      0 - 18569)
 b:    525184  19015680       swap                     # (Cyl.  18570 - 19082*)
 d:  19540864         0     unused      0     0        # (Cyl.      0 - 19082*)
On sparc64:
# disklabel -r -e -I raid0
[...snip...]
total sectors: 19539968
[...snip...]
3 partitions:
#        size    offset     fstype [fsize bsize cpg/sgs]
 a:  19251200         0     4.2BSD      0     0     0  # (Cyl.      0 -  18799)
 b:    288768  19251200       swap                     # (Cyl.  18800 -  19081)
 c:  19539968         0     unused      0     0        # (Cyl.      0 -  19081)
Next, format the newly created /
partition as a 4.2BSD FFSv1 File System:
#newfs -O 1 /dev/rraid0a /dev/rraid0a: 9285.0MB (19015680 sectors) block size 16384, fragment size 2048 using 51 cylinder groups of 182.06MB, 11652 blks, 23040 inodes. super-block backups (for fsck -b #) at: 32, 372896, 745760, 1118624, 1491488, 1864352, 2237216, 2610080, 2982944, ...............................................................................#fsck -fy /dev/rraid0a ** /dev/rraid0a ** File system is already clean ** Last Mounted on ** Phase 1 - Check Blocks and Sizes ** Phase 2 - Check Pathnames ** Phase 3 - Check Connectivity ** Phase 4 - Check Reference Counts ** Phase 5 - Check Cyl groups 1 files, 1 used, 4679654 free (14 frags, 584955 blocks, 0.0% fragmentation)
The new RAID filesystems are now ready for use. We mount
them under /mnt and copy all files from the
old system. This can be done using dump(8) or pax(1).
#mount /dev/raid0a /mnt#df -h /mnt Filesystem Size Used Avail %Cap Mounted on /dev/raid0a 8.9G 2.0K 8.5G 0% /mnt#cd /; pax -v -X -rw -pe . /mnt [...snip...]
The NetBSD install now exists on the RAID filesystem. We need
to fix the mount-points in the new copy of
/etc/fstab or the system will not come up
correctly. Replace instances of wd0 with
raid0.
The swap should be unconfigured upon shutdown to avoid
parity errors on the RAID device. This can be done with a simple,
one-line setting in /etc/rc.conf.
# vi /mnt/etc/rc.conf
swapoff=YES
Next the boot loader must be installed on Disk1/wd1. Failure to install the loader on Disk1/wd1 will render the system un-bootable if Disk0/wd0 fails making the RAID-1 pointless.
Tip
Because the BIOS/CMOS menus in many x86 based systems are misleading with regard to device boot order. I highly recommend utilizing the "-o timeout=X" option supported by the x86 1st stage boot loader. Setup unique values for each disk as a point of reference so that you can easily determine from which disk the system is booting.
Caution
Although it may seem logical to install the 1st stage boot block into
/dev/rwd1
with installboot(8) , this is no longer the case since NetBSD 1.6.x.
If you make this mistake, the boot sector will become irrecoverably damaged
and you will need to start the process over again.{c,d}
On x86, install the boot loader into /dev/rwd1a
:
# /usr/sbin/installboot -o timeout=30 -v /dev/rwd1a /usr/mdec/bootxx_ffsv2
File system:         /dev/rwd1a
Primary bootstrap:   /usr/mdec/bootxx_ffsv2
Ignoring PBR with invalid magic in sector 0 of `/dev/rwd1a'
Boot options:        timeout 30, flags 0, speed 9600, ioaddr 0, console pc
Note
As of NetBSD 6.x, the default filesystem type on x86 platforms
is FFSv2 instead of FFSv1. Make sure you use the correct 1st stage boot block file
/usr/mdec/bootxx_ffsv
when running the installboot(8) command.{1,2}
To find out which filesystem type is currently in use, the command file(1) or dumpfs(8) can be used:
# /usr/bin/file -s /dev/rwd1a
/usr/bin/file -s /dev/rwd1a
/dev/rwd1a: Unix Fast File system [v2] (little-endian), last mounted on ...
or
# /usr/sbin/dumpfs -s /dev/rwd1a
file system: /dev/rwd1a
format  FFSv2
endian  little-endian
...
On sparc64, install the boot loader into
/dev/rwd1a as well, however the "-o" flag is
unsupported (and un-needed thanks to OpenBoot):
# /usr/sbin/installboot -v /dev/rwd1a /usr/mdec/bootblk
File system:         /dev/rwd1a
Primary bootstrap:   /usr/mdec/bootblk
Bootstrap start sector: 1
Bootstrap byte count:   5140
Writing bootstrap
Finally the RAID set must be made auto-configurable and the system should be rebooted. After the reboot everything is mounted from the RAID devices.
#raidctl -v -A root raid0 raid0: Autoconfigure: Yes raid0: Root: Yes#tail -2 /var/log/messages raid0: New autoconfig value is: 1 raid0: New rootpartition value is: 1#raidctl -v -s raid0 [...snip...] Autoconfig: Yes Root partition: Yes Last configured as: raid0 [...snip...]#shutdown -r now
Warning
Always use shutdown(8) when shutting down. Never simply use reboot(8). reboot(8) will not properly run shutdown RC scripts and will not safely disable swap. This will cause dirty parity at every reboot.
At this point, temporarily configure your system to boot Disk1/wd1. See notes in Section 16.3.10, “Testing Boot Blocks” for details on this process. The system should boot now and all filesystems should be on the RAID devices. The RAID will be functional with a single component, however the set is not fully functional because the bogus drive (wd9) has failed.
#egrep -i "raid|root" /var/run/dmesg.boot raid0: RAID Level 1 raid0: Components: component0[**FAILED**] /dev/wd1a raid0: Total Sectors: 19540864 (9541 MB) boot device: raid0 root on raid0a dumps on raid0b root file system type: ffs#df -h Filesystem Size Used Avail Capacity Mounted on /dev/raid0a 8.9G 196M 8.3G 2% / kernfs 1.0K 1.0K 0B 100% /kern#swapctl -l Device 1K-blocks Used Avail Capacity Priority /dev/raid0b 262592 0 262592 0% 0#raidctl -s raid0 Components: component0: failed /dev/wd1a: optimal No spares. component0 status is: failed. Skipping label. Component label for /dev/wd1a: Row: 0, Column: 1, Num Rows: 1, Num Columns: 2 Version: 2, Serial Number: 2009122601, Mod Counter: 65 Clean: No, Status: 0 sectPerSU: 128, SUsPerPU: 1, SUsPerRU: 1 Queue size: 100, blocksize: 512, numBlocks: 19540864 RAID Level: 1 Autoconfig: Yes Root partition: Yes Last configured as: raid0 Parity status: DIRTY Reconstruction is 100% complete. Parity Re-write is 100% complete. Copyback is 100% complete.
We will now add Disk0/wd0 as a component of the RAID. This will destroy the original file system structure. On x86, the MBR disklabel will be unaffected (remember we copied wd0's label to wd1 anyway) , therefore there is no need to "zero" Disk0/wd0. However, we need to relabel Disk0/wd0 to have an identical NetBSD disklabel layout as Disk1/wd1. Then we add Disk0/wd0 as "hot-spare" to the RAID set and initiate the parity reconstruction for all RAID devices, effectively bringing Disk0/wd0 into the RAID-1 set and "synching up" both disks.
#disklabel -r wd1 > /tmp/disklabel.wd1#disklabel -R -r wd0 /tmp/disklabel.wd1
As a last-minute sanity check, you might want to use diff(1) to ensure that the disklabels of Disk0/wd0 match Disk1/wd1. You should also backup these files for reference in the event of an emergency.
#disklabel -r wd0 > /tmp/disklabel.wd0#disklabel -r wd1 > /tmp/disklabel.wd1#diff /tmp/disklabel.wd0 /tmp/disklabel.wd1#fdisk /dev/rwd0 > /tmp/fdisk.wd0#fdisk /dev/rwd1 > /tmp/fdisk.wd1#diff /tmp/fdisk.wd0 /tmp/fdisk.wd1#mkdir /root/RFbackup#cp -p /tmp/{disklabel,fdisk}* /root/RFbackup
Once you are certain, add Disk0/wd0 as a spare component, and start reconstruction:
#raidctl -v -a /dev/wd0a raid0 /netbsd: Warning: truncating spare disk /dev/wd0a to 241254528 blocks#raidctl -v -s raid0 Components: component0: failed /dev/wd1a: optimal Spares: /dev/wd0a: spare [...snip...]#raidctl -F component0 raid0 RECON: initiating reconstruction on col 0 -> spare at col 2 11% |**** | ETA: 04:26 \
Depending on the speed of your hardware, the reconstruction time will vary. You may wish to watch it on another terminal:
# raidctl -S raid0
Reconstruction is 0% complete.
Parity Re-write is 100% complete.
Copyback is 100% complete.
Reconstruction status:
  17% |******                                 | ETA: 03:08 -
After reconstruction, both disks should be “optimal”.
#tail -f /var/log/messages raid0: Reconstruction of disk at col 0 completed raid0: Recon time was 1290.625033 seconds, accumulated XOR time was 0 us (0.000000) raid0: (start time 1093407069 sec 145393 usec, end time 1093408359 sec 770426 usec) raid0: Total head-sep stall count was 0 raid0: 305318 recon event waits, 1 recon delays raid0: 1093407069060000 max exec ticks#raidctl -v -s raid0 Components: component0: spared /dev/wd1a: optimal Spares: /dev/wd0a: used_spare [...snip...]
When the reconstruction is finished we need to install the
boot loader on the Disk0/wd0. On x86, install the boot loader
into /dev/rwd0a:
# /usr/sbin/installboot -o timeout=15 -v /dev/rwd0a /usr/mdec/bootxx_ffsv2
File system:         /dev/rwd0a
Primary bootstrap:   /usr/mdec/bootxx_ffsv2
Boot options:        timeout 15, flags 0, speed 9600, ioaddr 0, console pc
On sparc64:
# /usr/sbin/installboot -v /dev/rwd0a /usr/mdec/bootblk
File system:         /dev/rwd0a
Primary bootstrap:   /usr/mdec/bootblk
Bootstrap start sector: 1
Bootstrap byte count:   5140
Writing bootstrap
And finally, reboot the machine one last time before proceeding. This is required to migrate Disk0/wd0 from status "used_spare" as "Component0" to state "optimal". Refer to notes in the next section regarding verification of clean parity after each reboot.
# shutdown -r nowAt this point, you need to ensure that your system's hardware can properly boot using the boot blocks on either disk. On x86, this is a hardware-dependent process that may be done via your motherboard CMOS/BIOS menu or your controller card's configuration menu.
On x86, use the menu system on your machine to set the boot device order / priority to Disk1/wd1 before Disk0/wd0. The examples here depict a generic Award BIOS.

Save changes and exit.
>> NetBSD/i386 BIOS Boot, Revision 5.2 (from NetBSD 5.0.2)
>> (builds@b7, Sun Feb 7 00:30:50 UTC 2010)
>> Memory: 639/130048 k
Press return to boot now, any other key for boot menu
booting hd0a:netbsd - starting in 30
You can determine that the BIOS is reading Disk1/wd1 because the timeout of the boot loader is 30 seconds instead of 15. After the reboot, re-enter the BIOS and configure the drive boot order back to the default:

Save changes and exit.
>> NetBSD/x86 BIOS Boot, Revision 5.9 (from NetBSD 6.0)
>> Memory: 640/261120 k

     1. Boot normally
     2. Boot single use
     3. Disable ACPI
     4. Disable ACPI and SMP
     5. Drop to boot prompt

Choose an option; RETURN for default; SPACE to stop countdown.Option 1 will be chosen in 0 seconds.
Notice how your custom kernel detects controller/bus/drive assignments independent of what the BIOS assigns as the boot disk. This is the expected behavior.
On sparc64, use the Sun OpenBoot devalias to confirm that both disks are bootable:
Sun Ultra 5/10 UPA/PCI (UltraSPARC-IIi 400MHz), No Keyboard
OpenBoot 3.15, 128 MB memory installed, Serial #nnnnnnnn.
Ethernet address 8:0:20:a5:d1:3b, Host ID: nnnnnnnn.

ok devalias
[...snip...]
cdrom /pci@1f,0/pci@1,1/ide@3/cdrom@2,0:f
disk /pci@1f,0/pci@1,1/ide@3/disk@0,0
disk3 /pci@1f,0/pci@1,1/ide@3/disk@3,0
disk2 /pci@1f,0/pci@1,1/ide@3/disk@2,0
disk1 /pci@1f,0/pci@1,1/ide@3/disk@1,0
disk0 /pci@1f,0/pci@1,1/ide@3/disk@0,0
[...snip...]

ok boot disk0 netbsd
Initializing Memory [...]
Boot device /pci/pci/ide@3/disk@0,0 File and args: netbsd
NetBSD IEEE 1275 Bootblock
>> NetBSD/sparc64 OpenFirmware Boot, Revision 1.13
>> (builds@b7.netbsd.org, Wed Jul 29 23:43:42 UTC 2009)
loadfile: reading header
elf64_exec: Booting [...]
symbols @ [....]
 Copyright (c) 1996, 1997, 1998, 1999, 2000, 2001, 2002, 2003, 2004, 2005,
     2006, 2007, 2008, 2009
     The NetBSD Foundation, Inc.  All rights reserved.
 Copyright (c) 1982, 1986, 1989, 1991, 1993
     The Regents of the University of California.  All rights reserved.
[...snip...]
And the second disk:
ok boot disk2 netbsd
Initializing Memory [...]
Boot device /pci/pci/ide@3/disk@2,0: File and args:netbsd
NetBSD IEEE 1275 Bootblock
>> NetBSD/sparc64 OpenFirmware Boot, Revision 1.13
>> (builds@b7.netbsd.org, Wed Jul 29 23:43:42 UTC 2009)
loadfile: reading header
elf64_exec: Booting [...]
symbols @ [....]
 Copyright (c) 1996, 1997, 1998, 1999, 2000, 2001, 2002, 2003, 2004, 2005,
     2006, 2007, 2008, 2009
     The NetBSD Foundation, Inc.  All rights reserved.
 Copyright (c) 1982, 1986, 1989, 1991, 1993
     The Regents of the University of California.  All rights reserved.
[...snip...]
At each boot, the following should appear in the NetBSD kernel dmesg(8) :
Kernelized RAIDframe activated
raid0: RAID Level 1
raid0: Components: /dev/wd0a /dev/wd1a
raid0: Total Sectors: 19540864 (9541 MB)
boot device: raid0
root on raid0a dumps on raid0b
root file system type: ffs
Once you are certain that both disks are bootable, verify the RAID parity is clean after each reboot:
# raidctl -v -s raid0
Components:
          /dev/wd0a: optimal
          /dev/wd1a: optimal
No spares.
[...snip...]
Component label for /dev/wd0a:
   Row: 0, Column: 0, Num Rows: 1, Num Columns: 2
   Version: 2, Serial Number: 2009122601, Mod Counter: 67
   Clean: No, Status: 0
   sectPerSU: 128, SUsPerPU: 1, SUsPerRU: 1
   Queue size: 100, blocksize: 512, numBlocks: 19540864
   RAID Level: 1
   Autoconfig: Yes
   Root partition: Yes
   Last configured as: raid0
Component label for /dev/wd1a:
   Row: 0, Column: 1, Num Rows: 1, Num Columns: 2
   Version: 2, Serial Number: 2009122601, Mod Counter: 67
   Clean: No, Status: 0
   sectPerSU: 128, SUsPerPU: 1, SUsPerRU: 1
   Queue size: 100, blocksize: 512, numBlocks: 19540864
   RAID Level: 1
   Autoconfig: Yes
   Root partition: Yes
   Last configured as: raid0
Parity status: clean
Reconstruction is 100% complete.
Parity Re-write is 100% complete.
Copyback is 100% complete.